Sunday 3 March 2013

Couture Creations Design Team Application R 2


          Couture Creations Design Team Application Round 2


 Altered  Box


Supplies needed:
Couture Creations  Embossing folders Without a lock and Exotic
Nestable top note die
 Core’dinations Cardstock  x2
Patterned paper
Brown Ink
Lace
Linen trim
Flowers
Metal embellishments
Sanding block
Gesso

Instructions

1. Choose box to alter, sand and prime                            


2. Cut Core’dinations Cardstock    to cover sides, distress all edges.


3. Place all cut pieces into Exotic, Couture Creation Embossing Folder.


4. Sand Random embossed high points

5. Adhere patterned paper to top and embossed paper to sides


6. Ink lid and sides

7. Cut various pieces of patterned paper and Coordination card stock and layer on lid , the top layer is a piece of Core’dinations Cardstock   embossed with Couture Creations without a lock embossing folder.


8. Layer flowers and metal embellishment on bottom left

9. Cut a top note shape with a die and then adhere above and below without a lock embossed piece.


10. Adhere lace to lid, and metal embellishment to front.


Your box is now complete


Here is a card I made with the scraps , I have enjoyed creating a project using the Couture creation products thanks for stopping by.


Please go to the Couture creations blog and subscribe to their mailing list to see the amazing products they have and to be eligible for  future contests.

 http://couturecreationsaus.blogspot.com.au/

Saturday 23 February 2013

“Couture Creations First Design Team Audition”

“Couture Creations First Design Team Audition” 

Hi everyone this post is my submission for Couture Creations, i am applying to be apart of their first design team. 
I am excited to post some of my work to display skills and hope my readers click the link below and check out out Couture Creations . 

http://couturecreations.com.au/

Now here are some examples of my work :


Thanks for stopping by Geordie

Friday 22 February 2013

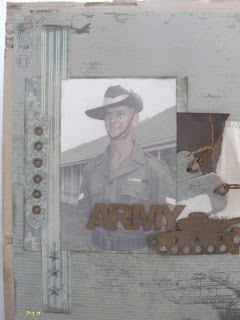
My army hero layout FabScraps Adrenaline collection


Adrenaline C54 collection

My army hero layout
Supplies:
Adrenaline Double-Sided Paper 12"X12" C54001,002,005,006
Adrenaline Die-Cut Work Book 8"X8"
Adrenaline Journal Tags, Shapes & Pages 8"X4" Pad  MC54001
Adrenaline Card stock Stickers 8.25"X5.25 ST54001
eyelets
brown ink
2 By 3 piece of calico
brown card stock
12 by 12 corrugated cardboard
6 brads
brown twine

instructions:
1. Ink edge of 12 by 12 corrugated card stock with brown ink and tear parts to show corrugation
2. Cut C54001 11 by 11  ink edges
3. Add brads top right corner and bottom left corner in sets of 3
4. Cut C54006 Bside 7.5 by 8 
5. Tear brown card stock 3 by 4
6.Cut C54 2 by 7 ink edges on b side
7 Adhere star stickers to bottom of this piece
8 .Layer all pieces including the calico 
9.Press out  2 tags and ink edges and attach brown twine
10.From the die cut workbook cut belt piece and add in eyelets adhere to left side on picture
now you are completed


Monday 4 February 2013

Grace Girl FabScraps DT project Little peeps

Gracie Girl layout

Supplies needed:

Little Peeps Double-Sided Paper 12"X12" C56005,006 both A and B sides x2
Non-Adhesive Flat Back Pearl & Rhinestone Collection Pack MP2 003
Flowers from stash
Seam binding
Cheese cloth
Paper bag
foam tape
Pink Ink
glitter letters
mist


Instructions:

1.Using a 4 by 6 picture mount the picture on C56005,006 , creating layers with the  two sides of each paper
2.Using a white paper bag cut and create more layers behind the picture and ink all edges with pink ink before adhearing
3.Adhere the stack to the bottom left corner about 2 inches up
4. Place a cluster of flowers on bottom left corner of picture stack
5. Tie some seam binding in a bow and adhere into cluster
6. Fussy cut the image on C56006 (fairy on mushroom)   
7. Paint fairy wings with glitter
8. Adhere cut image to flat image on page bottom right
9. Using flat back pearls add to image adding texture to spoys on the mushrooms
10.Spray entire layout with mist  to create a dusted look
11.Ink all edges of layout with pink ink.


your project is now complete


Sunday 3 February 2013

Bedtime stories Fabscraps DT project


Bedtime Stories Layout


Supplies needed
Little Peeps Double-Sided Paper 12"X12" C56007
Little Peeps Double-Sided Paper 12"X12"C56008
DC56 015 Bedtime Stories 5.75"X3"
Die-Cut Grey Chipboard Embellishments DC56016
Little Peeps Journal Tags, Shapes & Pages 8"X4" Pad MC56001
Gesso
texture swatch
Lace
dark blue Ink 
mist

Instructions

1.Using a 4 by 6 picture mount the picture on C56007,008 , creating layers with the  two sides of each paper
2. spread gesso  on C56007  on right side spreading on right side of page creating a rectangle like shape, also spread a little gesso on top left and bottom corners.
3.Create more layers behind the picture with 007 and 008 B sides on different angles and ink all edges with blue ink before adhearing
4.Adhere the stack to the bottom right corner about 3 inches  up
5. Place a chipboard embelishment on top  of texture swatch then add sticker on chipboard. 
5. adhere lace to cut embelishment from journal pad then adhere to bottom of picture
6.  then adhere texture swat on top  in bottom right of picture cluster
7. Ink bedtime stories chipboard time and then mist
8. Adhere chipboard on bottom left above cut piece out of journal stack and next to picture
9. spray entire layout with a fine mist creating more sparkles in background.
10 .Ink all edges of layout with blue ink.

your project is now complete


Saturday 2 February 2013

FabScraps Little peeps altered book stack


Little peeps Altered book stack 

supplies:

Little Peeps Double-Sided Paper 12"X12"
Product C56
papers for whole collection
3 x alterable  boxes in plain wood
white glue
brown ink
flowers and lace from stash
metal embellishments
music paper
sandpaper
gesso
mist

Instructions
1. Prep all boxes with gesso
2. Cover all 3 boxes in paper from the collection inside and out using white glue
3. When dry distress all edges of boxes with sandpaper
4. Ink all edges with brown ink
5. Add lace and trim to all 3 boxes where you  like it
6. Then stack boxes on each other on angles  to create areas for embellishing
7. Embellish with flowers and metal
8. Spray with mist

your project is now complete


Tuesday 13 November 2012

Just a little mini


Hi everyone just wanted to post some pics of  a little mini I made, I hope you enjoy


H